Boots and Pads: A True Breakthrough In Healing (12-28-05) Pete Ramey
Copyright 2005
When I started my own journey away from fixed metal shoeing and into the “barefoot world” in ’98, I looked at hoof boots simply as a crutch to help me through “transition”. When you pull shoes off a horse with truly healthy feet, or if you start natural hoof care early, with a foal there is little or no need for boots. In fact, we usually only need them long-term, when the riding terrain varies wildly from the living terrain. When you pull shoes off a horse with unhealthy feet, though, the boots are wonderful for keeping the horse and rider happy while we wait for the hooves to become healthy.
I’ve made a lot of mistakes in my career. At this point I have realized my biggest one has been under-use of hoof boots. I was in so much hurry to get to the unequaled traction, health and energy dissipation of the barefoot horse, I was overlooking the quickest way to get there! I used to feel defeated when I had to use boots. I never realized how much I passed this feeling to my horse owners until I, myself, started looking at boots differently. At some point, I started considering hoof boots to be the 21st century horseshoe. They allow us to have our cake and eat it too. We can provide the health and function of barefoot turnout and still protect the hooves when the demands of the rider exceed the health and capabilities of the hoof. The owner continues using the horse while watching the health of the hooves steadily improve, rather than steadily becoming less healthy over the years as is often the case.
Our own imaginations are the limit. Any traction device or traction reducing device that could possibly be attached to a hoof, can be attached to a hoof boot. I started requiring that customers buy boots when I pull shoes off unhealthy hooves. When they don’t need them any more, I often buy them back and sell them “used” to someone else. When I shifted my business this way, my customer satisfaction increased dramatically. I came to consider it a challenge and a personal responsibility to ensure that if the horse was rideable in its shoes when I arrived, it would be performing the same or better when I left. This attitude and added responsibility I took on sent me on a whirlwind of new learning. Often the boot alone wasn’t enough to achieve this, so I started experimenting with foam insoles and frog supports. I wasn’t alone; I’ve picked up valuable information from others who have been experimenting with similar systems; like Gene Ovnicek and Tommy Lee Osha. To my excitement, I started finding that the boots could not only match the comfort level provided by fixed shoeing, they almost always exceed it dramatically.
I found that these methods could get horses comfortable enough to ride when no fixed shoeing methods seemed to help. Of course once we get a lame horse working, the stimulation speeds growth and increases circulation. It speeds up everything we’re trying to accomplish in growing healthy hooves, taking rehab times to amazing new speeds. I used to be very happy if I could start with a horse with a 15 degree P3 rotation or a navicular horse, and get the owners riding the horse in a year. These days, I am really scratching my head if I can’t do it in a month. Basically, if there is not an abscess, chronic internal pathology or current acute laminitis we can find a boot/pad combination that puts the hooves to work (and sometimes when these situations are present, we still can).
I put a lot of pressure on the AANHCP trimmers that come to my clinics. In front of the horse owners attending, I say that a competent natural hoof care professional must carry a full stock of hoof boots, a variety of pad material, and all the tools, materials and knowledge to customize the fit. The professional should leave the customer with a properly fitting boot that suits their needs and discipline. As the hoof changes the professional should automatically modify the boots to keep them fitting and providing for the support needs of the horse. This way, boot use adds 20 seconds to the tacking up process for the owner, and the rest is just pure enjoyment.
A horse owner who knows nothing about hooves or boots and orders them off the internet is only slightly more likely to have trouble-free riding than if they had ordered a box of keg horseshoes! They should be fit by someone who understands them and has experience with making them work. Improperly fit hoof boots rub, fall off, make “flopping noises” and are hard to get on….. Properly fit boots are luxurious; a dream to ride for the horse and the owner.
Now with all this talk about how hard I push boots on my clients, you might think that my clients are all riding in boots, now, rather than barefoot. This is not true. If you take away my new clients that have come along in the last six months, I have very few that need boots at all. Miles of riding in boots and pads, combined with barefoot turnout and routine trimming quickly gets the hooves so healthy there is usually little or no need for the boots after the hoof has grown through one growth cycle. I never realized what an incredible tool they could be. It was right under my nose for years and I just recently “got it”.
I’m going to lay out some of the treatment options I use. The primary boot I use is the Easyboot Epic. I’m no boot salesman, and I’m not going to become one. I like the Epics because their low profile design eliminates almost all chances of rubbing and the thin, light, compact construction doesn’t bring breakover forward and interfere with my trim mechanics. [I almost always cut out the back straps and the tooth covers and then mash the teeth flat with large pliers and file them smooth. I then usually cut ½ inch off the tongue (It makes them 10 times easier to get on), rasp a very large mustang roll on the front half of the boot and drill one or two ½ inch drain holes in the bottom.] When someone produces a boot I like better, I’ll start using it. This said, there are many boot designs out there now that work, so I’m not pushing a product here, as much as I am “the idea”.
The biggest problem with all boots is that they cause peripheral loading, just like a metal horseshoe. This means that the hoof walls are forced to bear all of the impact force without the help of the sole, bars and frog as nature intended. The laminae were never intended to have all the horse’s weight hanging from them. In fact this is so important, the only advantage I see in stock hoof boots at all, is that they aren’t on the horse 24-7; just when we ride. I started seeing big smiles on horse’s faces when I started putting foam rubber insoles in the boots. This allows all the structures on the bottom of the foot to work in unison like they’re supposed to.
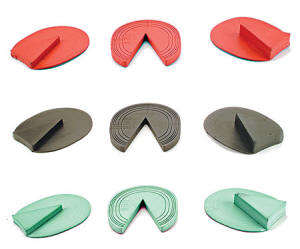
I had trouble finding the right pad for this, though. Most foams that are flexible enough to do this correctly, wear out very quickly. Most materials that are durable are too rigid. Luckily, Garrett Ford, the President of Easycare stepped up to the challenge. We started mailing material back and forth and I was trying them on my customer’s horses. After a dozen or so attempts, he finally sent me the right stuff. A new (and thankfully cheap) product was born; the Easycare Comfort Pads. (available by the end of Jan ’06) To save money for the customer, they come in two sizes; #3 and below, and #4 and up. On one side the Epic sizes are stenciled; Boa on the other side, so the customer can just cut out the correct size with a razor knife or heavy scissors. (I know, I’m sounding like a salesman again, but we worked hard to find this stuff, so I would be doing you an injustice not to tell you about it.)
Mirrored from www.hoofrehab.com/bootarticle.htm by HTTrack Website Copier/3.x [XR&CO’2006], Sun, 04 Jun 2006 04:02:45 GMT
Basically, I like to use them in the boots always; it just creates more natural mechanics. From that foundation, I’ll show you some of the other methods that have been revealed during this learning process:
Navicular Horses: Developing the back of the foot
If you will please read the article on my site www.hoofrehab.com “Digging for the Truth About Navicular Syndrome”, you will see that whether a horse with pain in the back of the foot has radiographic changes to the navicular bone or not, our goal is always to develop the digital cushions, lateral cartilages and dense frog callus. Successfully developing the lateral cartilages requires many miles of movement while the hoof capsule is free to twist and flex. Developing the digital cushions and frog callus requires many miles of movement while providing pressure and release (not constant pressure) to the entire length of the frog. (Dr. R.M. Bowker, MSU)
Previously, we had two options with navicular horses:
#1 We could shield the back of the foot from impact with fixed shoeing and pads. This often made navicuar horses feel better, but was a double-edged blade, because without pressure and release to the inner structures, they fall further out of function and eventually even the shoes and pads don’t work any more and the navicular horse is put down.
#2 We could keep the horse barefoot until the structure develops. This served us well and natural hoof care practitioners have brought comfort and total usability to many navicular horses this way, but the problem was that the horses were often “unusable” for a year or more. These horses are usually perfectly happy barefoot in the pasture, but when you add a rider and concussive terrain, a hoof boot alone is almost worthless. The vibration to the underdeveloped inner structures causes pain, even when the boot is preventing ground contact through the frogs.
True frog pressure necessary to develop the inner structures is hard to obtain in these horses. (Please read “Heel Height: The Deciding Factor” on www.hoofrehab.com ) The back of the foot is very sensitive and often if you provide what appears to be adequate frog pressure while the horse is standing on concrete for trimming, the pressure will be too much in the terrain the horse lives and works in. This will cause the horse to just run around on its tiptoes. Moving this way for ten years will not develop the structure at all. We often have to leave the frog off the concrete a bit, so that it gets a reduced pressure the horse will bear as the “long heels” sink into the terrain.
This situation is where the boots and pads become truly magical. We make a horse owner cry big “happy tears” at almost every clinic we teach. Occasionally it is because of the way a foundered horse steps out after my setup trim, but usually it is because of Ivy playing around with different pad combinations on someone’s navicular horse. Very consistently, these horses will stride out long, happy and comfortable for the first time in years when you get the pads right. Often this is the first true frog pressure they have received in years; their very first chance to heal, in spite of the best farrier care available.
So what do we do? First we have to determine where the pain is coming from and either add to or take away from pressure in that region. Usually these horses with inadequate structure in the back of the foot will have shriveled weak frogs, and digital cushions that feel soft and squishy because of the lack of fibrocartilage. The horse will stride out nicely on the grass, but if you lead it across gravel or any firm footing it will shorten stride and land on its toes. Don’t accept this destructive movement! This should automatically start you on a search for proper movement that can heal the situation, and you can find it if you insist on it.
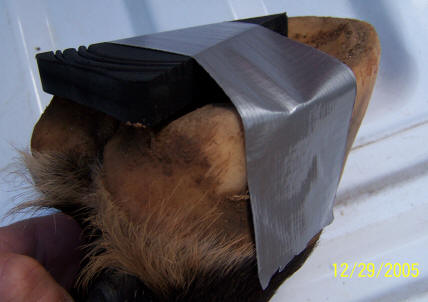
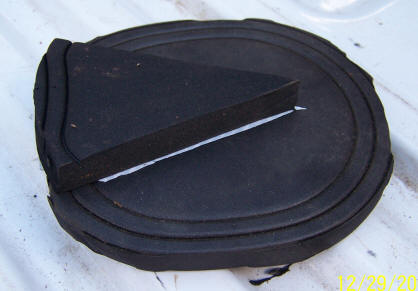
Sometimes the foam insole alone will do the trick. If the heels are contracted and the frog is deeply recessed between the heels, you may need to build more material under the frog. I usually use the softer neoprene saddle pads for this, but sometimes the denser insole material is right. You just have to ask the horse. I use two methods for this, depending on the situation. Sometimes I cut the owner a bunch of frog shaped pads. They then put the frog pad over the frog, tape it in place with one piece of duct tape; then put it in the boot.
I know this may sound like a lot of trouble, but actually only takes seconds to do. Also remember we’re often talking about horses no one else has been able to get comfortable enough to ride; let alone provide a way to heal. It’s worth the trouble!
Another method that works well is to tape the frog shaped pad to the insole with double-sided carpet tape or glue. I use a glue called Goop, available at auto parts stores. It saves the owner a step while tacking up, but tends to cause people to not change the frog pad often enough to keep proper pressure to the region and it is not quite as “idiot-proof” for getting proper placement.
Sometimes it works the other way and we need to reduce frog pressure for a while. Especially if the horse has been routinely shod without frog support, the inner structures including the frog corium will prolapse or sink between the shoe heels. The frog was yearning for more natural pressure and moved into that pathological position trying to adapt, but pulling the shoes leaves the frog standing too tall and usually receiving more pressure than it can comfortably bear on firm footing. Since the inner structures themselves have moved downward, trimming the frog “out of harm’s way” tends to over-thin the frog material and increase sensitivity. If you just turn the horse out on yielding footing, the frog will quickly remodel itself into a more correct position, but this usually means a month or so without riding for the owner. Again, a little bit of thinking can usually fix this problem, too. Just cut the frog shape out of the insole and riding usually continues without missing a minute. This one is always a very temporary measure.
All of these systems and the countless ones we haven’t thought of yet, usually need to be tweaked and changed as the situation changes in the feet. For instance the increased frog pressure pads will dampen vibration and start to allow the horse to work the back of the foot, often for the first time in many years. As with any other weak, living thing we start to exercise, we can overdo it and create soreness. Don’t be discouraged; change your system. Usually switching to a softer or thinner frog pad, or switching back to a flat insole will “rest” the back of the foot while the horse stays comfortable for riding. This is one of the main beauties of the whole system. We don’t have to make all of our support decisions and then live with them for six weeks as we did with fixed shoeing. Any owner can easily be taught to change the insoles as the horse requires; as the situation changes throughout rehabilitation.
The lack of the development of the lateral cartilages, the digital cushions and the frog callus are at the very heart of long-term under run heels, severely contracted heels and also most negative palmar angle coffin bones. All of this new knowledge is just as dramatic for these cases as it is for navicular horses; usually bringing immediate comfort for riding while accelerating true healing beyond anything I’ve previously seen.
Same goes with club feet. If you read the article on my site “Club Foot”, you will see that I rarely look at club feet as hoof problems, but as adaptations to another problem, usually way above the hairline. To truly fix a club foot you have to identify and fix whatever is shortening stride on that side. If you can do this, the hoof will adapt back toward a natural situation with just normal trimming to the live sole plane. However when a club foot has been around for a long time, we’ll see the same severe lack of structure in the back of the foot we’ve been describing here. If you whack the heels off the club foot, the sensitive structures are overexposed and the horse runs around on its toes anyway, often with steeper angles than before the trim. This is a very dangerous mistake to make. Instead, use the same miles and miles of riding on the frog pads to develop the inner structures into something useable by the horse.
Foundered Horses: Support, Stimulation and Pain ReliefThe second key area I’ve seen the boots and pad combos speed healing up to an “impossible” level is with foundered horses. Please read the articles “Laminitis Update” and then “Breakover” on www.hoofrehab.com for all of the protocols I’ve found to be effective. This article simply expands on one tiny piece of the whole picture. The boots are by far the most effective means of maximizing both current protection and healing mechanics I can imagine.
There are some very important problems inherent to fixed shoeing when you are faced with a horse that has lost its proper attachment between the hoof wall and the coffin bone. Our only option is to stabilize the relationship between P3 and the hoof wall long enough to grow an entire new hoof capsule from top to bottom that is well connected. Traditionally, farriers have used many different means to try to stabilize the situation, but the one thing they all have in common is that this P3 support is rigidly attached to the hoof wall itself. [This is not to say that competent farriers have never helped a foundered horse. I know I made foundered horses feel better and improved their situation with several different fixed shoeing combinations I once used, and was proud of my work. No one can take that good feeling away from me, so I truly understand why farriers get so defensive when “evangelistic barefoot people” act like they are evil boogie-men.]
But we can always learn more. In a foundered horse, the walls themselves are not properly attached to anything except perhaps the coronet and even the coronet is usually in the wrong place relative to P3. This means that any P3 support attached to the walls is not truly stable, either. The resulting shift and movement is enough to keep the new growth constantly “aggravated” and stressed just enough to make the growth of a new, perfectly attached hoof capsule in shoes almost impossible. (Perhaps actually impossible, but I threw in the “almost” to give all the farriers who’s work I have not seen, the benefit of the doubt)
Even worse, the hoof wall is constantly growing, so even if someone does apply a fixed shoe that provides perfect P3 support today, by tomorrow, this support has crept away a bit with the growth of the wall. By the time four weeks have gone by, this “support” has moved away ¼ inch or more, and there is nothing to stop P3 from sinking right along with it. Again, the horse was never intended to hang from the laminae without sole support from below, but they do get by when people routinely force them to do it. When the laminae are weakened and inflamed, though, it is a prescription for disaster.
The simple concept of supporting P3 through a heavily callused sole and relieving the walls in the front half of the foot from active ground pressure has served natural hoof care practitioners well, and 20 degree rotations are being routinely grown out all over the world, while most shoers still think that a 5 degree rotation is incurable. Now you know the main reason why.
Not that the “barefoot way” is without its own problems…. The thick callused sole was designed to help support the horse and it manages to temporarily do it alone very well, until the well attached walls grow in to aid in the task. Very often, though, the previous farrier or trimmer has been rasping the sole out from under P3 (Please read “Reading the Soles” on my site. Everyone who touches a hoof or owns a horse should be aware of the “electro-shock rasp”!!!). The sensitive corium may be exposed or only protected by 1/16th inch of sole. Also, if the horse is still in acute laminitis, the sole’s corium may be inflamed and hypersensitive; just like the laminae. The quickest way to build sole material, like frog material, is with miles of pressure and release. Exercise is also one of the best ways to counteract the pitfalls of excess nutrition in these cases. But this is easier said than done with a foundered horse, plus it’s dangerous. If you do force-walk a lame, foundered horse with a thin inflamed sole, you are not only being shamefully cruel, you also risk the bruising of the sole’s corium. This will lead to abscessing and to the horse having to start a new sole from scratch.
Also, much of the sole’s blood supply comes from the circumflex artery that wraps around the distal perimeter of P3. If the soles are thin, pressure to the region can pinch off blood supply and reduce the growth capabilities of the sole through simple starvation. So again, even though we have set up mechanics for well attached growth to move in we can also set up a situation where movement is uncomfortable and even dangerous. Many, including me, have previously taken these facts as “a risk we have to take”, as the only other option is often simply destroying the horse. We fixed hundreds of chronic founder cases that way; by keeping the horse on firm, but yielding footing (free of rocks) and patiently waiting for enough structure to form to increase comfort.
This is where the boots and pads came to the rescue again and took it all to a much higher level. Like with the navicular horses, we can have our cake and eat it too. We can provide perfect “new growth mechanics” while at the same time offering protection better than the world has ever seen. They will make almost (That “almost” is just simple honesty.) all foundered hooves ready to exercise; sometimes even comfortably ride as soon as the diet is stabilized well enough to bring the horse out of the acute phase; regardless of the amount of rotation or vertical displacement (provided there are no accompanying abscesses already present). [Never ride or “force-walk” a lame horse. Wait until you achieve comfort for each!]
Usually the padding is much simpler with foundered horses; just a flat insole is all you’ll usually need, though you may find an individual horse needs two of them, in which case the Epics won’t work. You’ll have to use the Boa or another “top loading” boot like the Old Mac and others.
We do, however, often need to turn the horses out in the boots at first, which creates a few more “hassles” you need to know about. The boots were designed to be on for riding only and many models do very well for this. When you leave a hoof boot on for long periods, rubbing or chaffing becomes more likely. Now a little chafing may not seem like a big deal when you are talking about full recovery from a P3 rotation, but we need to do everything humanly possible to help the poor horse. The best ways I know to eliminate this are:
#1 Use Epics. (There I go sounding like a boot salesman again. I’m sorry, but I’m just delivering you the facts as I know them.) 24-7 turnout can be successfully done with many boot brands, but with the Epics, the only thing that even touches skin is the soft, snug upper gaiter.
#2 Make “socks” that cover the hair/skin with vet-wrap.
#3 Sprinkle Gold Bond Medicated Powder on the whole foot before you boot it. This also drastically reduces the “funk” in the boots.
#4 Be sure the boot fits properly. If it can twist on the foot it will rub.
#5 Pull the boots off every day to clean, sanitize, dry out and inspect. If you do see a rub starting, put duct tape over the rub before you apply the vet-wrap sock. This will ensure any further movement will be on the slick tape, not on the horse.
#6 Stop using the boots for turnout as soon as the horse is moving comfortably in its paddock without them, but continue using the boots for riding and in-hand exercise until there are no separated laminae left at all, and the callused sole has reached optimum thickness.
This is a lot of trouble, I know. It places most of the responsibility and care on the shoulders of the horse owner. Fixed shoeing will always be more convenient. The farrier comes by every 4-6 weeks, resets the shoes and the owner has no more responsibilities other than to pay the bill. But guys, this works better so it has a place too, with the conscientious horse owner who really wants to fix their foundered horse permanently.
I need to tell a story that happened to me and few of my customers (two vet students and a vet tech) several months ago. They had a horse that had been in acute laminitis, lame and in a stall for three weeks. I trimmed the horse for them, and then suggested they turn it out in a paddock to allow her to start moving around. They immediately said the attending vet had told them to leave it in the stall until it felt better and had no elevated digital pulse or elevated hoof temperature. I knew I needed to get the horse out, but I never undermine veterinarians (bite the hands that feed me). So I asked them if it would be within their vet’s prescription to turn the horse out if I could make her comfortable and make the temperature and digital pulse normal before I left. With understandably skeptical smiles, they said, “Sure”.
So I set the horse up in boots and full pads and asked the owner to walk the horse for fifteen minutes. I asked her to come back immediately if the horse showed any lameness at all, but otherwise to keep on walking continuously the whole time. The horse strode out of there perfectly comfortable, and then came back fifteen minutes later with normal digital pulses and no elevated heat. Okay, I was “playing cool” a little bit. I didn’t know for sure the digital pulses would be normal, but new from experience there was at least a 90% chance of it. The horse relies on movement and hoof function to aid in circulation. When those ladies become doctors, they will remember that day, too. If you don’t believe my story, that’s okay. Go try it on one horse; the pads are magic.
Although I have been booting horses ever since I stopped shoeing, I really only started this “pad journey” three or four years ago. There is so much left to learn about it, so please take this start I’ve given you and then keep thinking; keep learning! Don’t accept a lame foot as an option; not for a day. Movement equals growth and development. Proper movement forges a proper hoof form. Proper hoof form equals little or no need for hoof protection and optimum performance. Patient experimentation with different pad options will accelerate your rehabilitation time beyond your wildest dreams.
Scarpette e solette: una vera scorciatoia verso la guarigione
Pete Ramey, 28.12.05
Copyright 2005 Pete Ramey
traduzione Alex Brollo
Quando ho iniziato il mio viaggio personale dalla ferratura al “mondo barefoot” nel ’98, guardavo alle scarpette semplicemente come una stampella per aiutarmi durante la “transizione”. Nel momento in cui si tolgono i ferri a un cavallo con i piedi veramente sani, o si incomincia ad applicare la cura naturale dello zoccolo molto presto, fin da quando il cavallo è un puledro, c’è poco bisogno di scarpette, o non ce n’è affatto. In realtà, ne abbiamo bisogno a lungo termine se dobbiamo cavalcare su terreni molto diversi da quello dove il cavallo vive. Invece, quando si sferra un cavallo con piedi non sani, le scarpette sono fenomenali per mantenere il cavallo e il cavaliere felici intanto che si attende che gli zoccoli guariscano.
Ho fatto un sacco di errori nella mia carriera. In questo momento, ho capito che il mio errore più grande è stato l’uso insufficiente delle scarpette. Avevo una tale fretta di ottenere l’ineguagliabile aderenza, la salute e le capacità di dissipare l’energia del cavallo scalzo, che mi è sfuggita la strada più veloce per arrivarci! Avevo l’abitudine di sentirmi sconfitto quando dovevo usare le scarpette. Non mi sono mai reso conto di quanto trasferivo questa sensazione ai proprietari dei miei cavalli, fino al giorno in cui io stesso ho cominciato a considerarle diversamente. Un bel giorno, ho cominciato a considerarle i ferri da cavallo del 21° secolo. Ci permettono di avere l’utile e il dilettevole. Possiamo godere dei benefici della permanenza all’aperto per la salute e la funzione degli zoccoli, e nello stesso tempo proteggerli, quando le richieste del cavaliere oltrepassano i limiti consentiti dalla salute e dalle capacità degli zoccoli in quel determinato momento. Il proprietario continua a usare il cavallo e nel frattempo osserva il progressivo miglioramento dei suoi zoccoli, piuttosto che doverne osservare il progressivo peggioramento negli anni come spesso accade.
L’unico limite alla loro utilizzazione è la nostra fantasia. Qualsiasi accessorio per aumentare o per ridurre l’aderenza, che possa essere applicato al ferro, può essere anche applicato alle scarpette. Ho cominciato con il pretendere che i proprietari acquistassero le scarpette nel momento stesso in cui sferravo zoccoli non perfettamente sani. Quando non ne avevano più bisogno, spesso le riacquistavo per rivenderle usate a qualche altro cliente. Appena ho organizzato il mio lavoro in questo modo, la soddisfazione dei miei clienti è cresciuta in modo drammatico. Sono giunto a considerare una sfida e una responsabilità personale il fatto di ottenere che se un cavallo può essere cavalcato ferrato nel momento in cui arrivo, deve avere prestazioni uguali o superiori nel momento che me ne vado. Questo atteggiamento e questa responsabilità aggiuntiva che mi sono accollato , mi hanno travolto con un turbine di nuove conoscenze. Spesso le sole scarpette non sono sufficienti a ottenere il risultato, e così ho cominciato a sperimentare solette in schiuma di gomma e supporti per il fettone. Con mio grande entusiasmo, ho cominciato a verificare che le scarpette potevano non solo uguagliare il livello di comfort fornito precedentemente dai ferri, ma quasi sempre lo miglioravano moltissimo.
Ho trovato che potevo far sentire il cavallo abbastanza comodo da poter lavorare, quando nient’altro otteneva questo risultato.Naturalmente, quando mettiamo un cavallo zoppo al lavoro, la stimolazione meccanica aumenta la crescita della muraglia e la circolazione del sangue. Velocizza tutto quello che noi stiamo tentando di ottenere per far crescere degli zoccoli sani, riducendo di molto i tempi della riabilitazione. In precedenza, ero abituato ad essere molto soddisfatto quando iniziavo con un cavallo con una rotazione di 15 gradi del triangolare o con un cavallo navicolare, e rimettevo il cavaliere in sella nel giro di un anno. Attualmente, mi domando cos’è andato storto se non ci riesco in un mese. In pratica, se non c’è un ascesso, una patologia cronica interna o una laminite acuta in atto, possiamo trovare una combinazione di scarpette/solette che consente di mettere gli zoccoli al lavoro (e qualche volta possiamo farlo anche quando le condizioni a cui ho accennato sono presenti).
Insisto moltissimo perchè i pareggiatori della AANHCP partecipino ai miei corsi. Alla presenza dei proprietari, affermo che un professionista competente dovrebbe sempre avere a disposizione un assortimento completo di scarpette, una varietà di materiali da usare come solette e tutto quello che gli serve (attrezzatura, materiali e addestramento) per adattarli alla perfezione. Il professionista deve andarsene lasciando al proprietario una scarpetta perfettamente adattata, che risponda alle sue necessità e alla disciplina che pratica. Quandolo zoccolo si modifica, il professionista deve modificare le scarpette di sua iniziativa per mantenerle della giusta misura e adatte a dare al cavallo il supporto necessario. Comportandosi in questo modo, l’uso delle scarpette allunga di 20 secondi il tempo che il proprietario impiega per preparare il cavallo, ed il resto è puro divertimento.
Il proprietario di un cavallo che non sa niente sugli zoccoli o sulle scarpette, e che le ordina su internet, ha una probabilità solo leggermente superiore di riuscire a cavalcare bene che se avesse ordinato una scatola di ferri di cavallo grezzi! Le scarpette vanno adattate da qualcuno che le conosca e che abbia l’esperienza necessaria per adattarle al meglio. Le scarpette che non calzano bene fiaccano, cadono, fanno “strani rumori” e sono difficili da indossare… Le scarpette ben adattate sono una libidine; consentono una cavalcata da sogno, sia per il cavallo che per il cavaliere.
A questo punto, con tutto questo parlare di quanto insisto con i proprietari perchè usino le scarpette, potreste pensare che tutti i miei clienti cavalchino con le scarpette, piuttosto che a zoccoli nudi. Non è vero. Escludendo i che si sono rivolti a me da non più di sei mesi, ne ho molto pochi che continuino ad averne bisogno. Miglia e miglia di cavalcate con le scarpette e con le solette riabilitano gli zoccoli così velocemente, che in genere c’è una necessità scarsa o nulla di usarle dopo un ciclo di crescita dello zoccolo. Non avevo mai capito che strumento efficace fossero. La cosa era proprio sotto il mio naso e solo recentemente ci sono arrivato.
Vi esporrò adesso alcune delle possibilità che ho verificato. Il modello di base che utilizzo è la Easyboot Epic. Non sono un venditore di scarpette, e non intendo diventarlo. Mi piacciono le Epic perchè il loro profilo basso elimina quasi ogni rischio di fiaccatura e perchè la loro struttura sottile, leggera, compatta non porta in avanti il breakover né interferisce con la meccanica ottenuta con il mio pareggio. [Quasi sempre taglio via il nastro posteriore e le protezioni per i denti, e poi appiattisco i denti con delle pinze robuste e li rendo lisci. Poi taglio via mezzo pollice della linguetta, cosa che rende 10 volte più facile indossarle, raspo un grande mustang roll sul margine anteriore della scarpetta e trapano uno o due fori di drenaggio sul fondo]. Quando qualcuno produrrà una scarpetta che mi piacerà di più, comincerò ad usarla. Questo per dire che ci sono molti modelli di scarpette funzionanti in commercio, e io non sto promuovendo un prodotto, ma uno “stile”.
Il principale problema con ogni tipo di scarpetta è che causano un carico periferico, proprio come un ferro di cavallo. Questo significa che la muraglia è costretta a sostenere l’intera forza di impatto senza l’aiuto della suola, delle barre e del fettone, come natura vuole.Le lamine non sono fatte per sostenere l’intero peso del cavallo che pende su di loro. In effetti questo è così importante, che a mio parere il solo vantaggio che io vedo nelle scarpette come sono vendute, è che non stanno sul cavallo per tutto il tempo,ma solo nel momento in cui lo cavalchiamo. Ho cominciato a vedere larghi sorrisi sui musi dei cavalli, quando ho iniziato ad usare inserti di gomma all’interno delle scarpette. Questo consente a tutte le strutture dello zoccolo di lavorare all’unisono come devono.
Tuttavia, ho faticato parecchio a trovare un materiale adatto alle solette. Gran parte delle schiume che sono abbastanza flessibili da farlo correttamente, si consumano troppo in fretta. La gran parte dei materiali durevoli sono troppo rigidi. Per fortuna, Garrett Ford, presidente della Easycare, ha raccolto la sfida. Abbiamo cominciato a spedirci avanti e indietro materiali, che provavo sui cavalli dei clienti. Dopo una dozzina di tentativi, finalmente mi ha spedito il materiale adatto. Era nato un prodotto nuovo (e per fortuna economico); le Easycare Comfort Pads. Per far risparmiare il cliente, è disponibile in due misure: da #3 in giù, e da 4# in su. Su uno dei lati sono incise le misure delle Boa; sull’altro, le misure delle Epic, per cui il proprietario può ritagliarle la misura giusta con un taglierino e con delle forbici affilate (lo so, sembro ancora un venditore, ma abbiamo lavorato duro per trovare questa soluzione e quindi sarebbe un’ingiustizia non parlarne).
Di regola, le uso sempre; semplicemente, consentono una meccanica più naturale. Partendo da queste basi, vi esporrò alcuni degli altri accorgimenti che sono saltati fuori durante la nostra sperimentazione.
Cavalli navicolitici: sviluppare la parte posteriore del piede
Se leggete l’articolo “Digging for the Truth About Navicular Syndrome”, vedrete che, a prescindere dal fatto che un cavallo con dolore alla parte posteriore del piede abbia o non abbia alterazioni radiologiche del navicolare, il nostro obiettivo è di far sviluppare correttamente i cuscinetti digitali, le cartilagini laterali ed il fettone. Uno sviluppo efficace delle cartilagini laterali richiede miglia e miglia di movimento, con uno zoccolo libero di piegarsi e di flettersi. Lo sviluppo dei cuscinetti digitali e del fettone richiedono miglia e miglia di movimento con alternanza di pressione e di rilascio (non di pressione costante), sull’intera lunghezza del fettone (Dr. R.M. Bowker, MSU)
A suo tempo, avevamo due possibilità:
1) potevamo mettere al riparo dagli urti la parte posteriore del piede con ferri e solette. Questo fa spesso sentire meglio il cavallo, ma è una spada a doppio taglio, perchè senza l’alternanza di pressione e rilascio sulle strutture interne, vengono ulteriormente private della loro funzione e alla fine nemmeno i ferri e le solette funzionano più e per il cavallo navicolare è finita.
2) potevamo tenere il cavallo sferrato finché la loro struttura interna si sviluppa. Questa strategia ci è servita molto, e molti professionisti della cura dello zoccolo hanno restituito alla salute e alla completa usabilità molti cavalli, m il problema è che il cavallo non poteva essere usato per un anno o più. In genere, questi cavalli stanno perfettamente bene sferrati al pascolo, ma se si aggiunge il peso di un cavaliere e un terreno duro, l’effetto di una sola scarpetta è insufficiente. La vibrazione causa dolore nelle strutture interne poco sviluppate, anche se le scarpette prevengono il contatto diretto con il suolo del fettone.
La pressione sul fettone, necessaria a sviluppare le strutture interne del piede, è difficile da ottenere in questi cavalli (Per favore, leggete “Heel Height: the Deciding Factor) su questo sito). La parte posteriore del piede è molto sensibile e spesso se voi fornite quella che sembra una pressione adeguata sul fettone quando il cavallo sta fermo sulla superficie piana su cui lo pareggiate, la pressione che avete ottenuto è eccessiva sul terreno dove il cavallo vive e lavora. Questo è il motivo per cui il cavallo non farà che correre sulle punte. Un movimento di questo tipo non sviluppa affatto le strutture interne. Spesso siamo costretti a lasciare il fettone un po’ sollevato dal suolo, in modo che trasferisca allo zoccolo una pressione ridotta nel momento in cui i “talloni lunghi” penetrano leggermente nel terreno.
Questa è la situazione in cui le scarpette unite alle solette sono veramente magiche. Abbiamo fatto piangere di gioia un proprietario in quasi tutti i corsi dove abbiamo insegnato. Qualche volta il motivo è il modo come un cavallo laminitico cammina dopo il mio pareggio, ma di solito è il risultato del lavoro di Ivy, che tenta differenti combinazioni di solette sul cavallo navicolare di qualcuno. Con grande regolarità, questi cavalli fanno vedere per la prima volta, dopo anni, passi lunghi, comodi e allegri, non appena si trovano le solette giuste. Spesso questa è la prima pressione adeguata sul fettone che ricevono da anni; la loro prima occasione di guarire, nonostante fossero sottoposti alle migliori tecniche di mascalcia disponibili.
Per cui: cosa facciamo? Per prima cosa dobbiamo capire da dove proviene il dolore e quindi aggiungete o togliere pressione in quella regione. In genere questi cavalli con una inadeguata struttura della parte posteriore del piede hanno fettoni deboli e raggrinziti, e cuscinetti digitali che si sentono morbidi e comprimibili per la mancanza di fibrocartilagine. Il cavallo mostrerà un passo normale sull’erba, ma se lo portate sulla ghiaia o su qualsiasi terreno duro accorcerà il passo e camminerà sulle punte. Non accettate questo movimento distruttivo! Questo deve fari automaticamente iniziare una ricerca per ottenere il movimento corretto che può risolvere il problema, e se insistete potete riuscirci.
Qualche volte il trucco è semplicemente l’applicazione di una semplice soletta. Se i talloni sono fortemente contratti e il fettone è fortemente risalito fra i talloni, potreste aver bisogno di un’aggiunta di materiale sotto il fettone. In genere uso per questo scopo la più morbida schiuma in neoprene da sella per ottenere questo risultato, ma talora un materiale più rigido è quello giusto. Dovete chiederlo al cavallo. Uso due metodi per ottenere il risultato, secondo le situazioni. Qualche volta taglio per il proprietario un ben gruppo di solette della forma del fettone. Poi loro sovrappongono la soletta al fettone, e la tengono ferma con un pezzo di nastro adesivo; e poi infilano lo zoccolo nella scarpetta.
Mi rendo conto che può sembrare problematico, ma in realtà è una cosa che richiede solo pochi secondi. Pensate che stiamo parlando di cavalli che non c’è modo di far stare abbastanza bene per essere cavalcati in nessun’altra maniera; questo sistema consente di imboccare la strada della guarigione. Ne vale la pena!
Un altro metodo che funziona bene è di incollare la soletta a forma di fettone sulla superficie di una soletta intera, con un nastro biadesivo. Risparmia al proprietario un passaggio al momento di preparare il cavallo, ma ha il difetto di far sì che la gente non cambi la soletta abbastanza spesso per assicurare una pressione costante sul fettone e non è proprio altrettanto “a prova di idiota” per ottenere il posizionamento corrette.
In alcuni casi, la cosa funziona in modo diverso, e abbiamo bisogno di ridurre la pressione sul fettone per qualche tempo. Specialmente nei casi in cui il cavallo è da tempo ferrato senza un supporto per il fettone, le strutture interne, compreso il corion del fettone, sporgono o affondano tra i talloni dei ferri. Il fettone ricerca una pressione più naturale e si sposta in questa posizione anormale per tentare di adattarsi, ma la sferratura lascia il fettone troppo alto e sottoposto ad una pressione più elevata di quella che può sopportare su un terreno duro. Poiché anche le strutture interne si sono spostate verso il basso, pareggiare il fettone tirandolo “fuori dai piedi” tende ad assottigliare eccessivamente la sostanza cornea del fettone rendendolo ipersensibile. SE lasciate il cavallo al pascolo su un terreno adatto, il fettone si rimodellerà rapidamente riassumendo la posizione corretta, ma questo significa almeno un mese di impossibilità di usare il cavallo. Di nuovo, un po’ di riflessione può permettere di risolvere anche questo problema. Non dovete far altro che tagliar via dalla suola un settore corrispondente al fettone, e in genere potete cavalcare senza perdere un solo minuto.
Tutti questi sistemi, e innumerevoli altri che abbiamo ideato finora, in genere richiedono di essere modificati man mane la situazione del piede cambia. Per esempio, l’aumentata pressione sul fettone con vibrazioni attenuate permette al cavalo di far lavorare la parte posteriore del suo piede, spesso per la prima volta dopo molti anni. Come avviene per molte altre strutture viventi indebolite che iniziamo a mettere al lavoro, possiamo esagerare e creare fastidio. Non lasciatevi scoraggiare; modificate il vostro sistema. In genere il passaggio a una soletta più sottile o più morbida farà “riposare” il piede, lasciando il cavallo abbastanza comodo da poter essere cavalcato. Questo è uno dei lati positivi della cosa. Non dobbiamo prendere tutte le decisioni e poi sopportarle per sei settimane come ci toccava quando ferravamo i cavalli. Ogni proprietario può essere istruito facilmente a adattare le solette nel modo preferito dal cavallo, man mano che le cose cambiano durante la riabilitazione.
L’insufficiente sviluppo delle cartilagini laterali, dei cuscinetti plantari e di una callosità dl fettone sono il problema fondamentale dei talloni scivolati in avanti da lungo tempo, dei talloni fortemente contratti e anche del maggior numero di casi di inclinazione negativa del triangolare. In tutti questi casi le nuove conoscenze hanno risultati drammatici come nei cavalli navicolari, restituendo di regola un comfort immediato sufficiente a cavalcare l’animale e nello stesso tempo accelerando la vera guarigione ad una velocità che prima non avevo mai visto.
Lo stesso vale per il piede incastellato. Se leggete l’articolo “Club foot” sul mio sito, vedrete che io vedo raramente questa alterazione come un problema dello zoccolo, e in genere lo considero secondario ad un problema sopra la corona. Per risolvere veramente un piede incastellato, prima dovete trovare e risolvere il problema che accorcia il passo da quel lato. Se accorciate i talloni sul piede incastellato, le strutture sensibili sono sovraesposte e il cavallo corre comunque sulle punte, spesso con un angolo maggiore di prima del pareggio. È un errore molto pericoloso. Invece, utilizzate le stesse miglia e miglia di cavalcate su solette per il fettone per far sviluppare le strutture interne fino al punto di diventare utilizzabili per il avallo.
I cavalli laminitici: sostegno, stimolazione e sollievo dal dolore
La seconda area chiave dove ho visto che la combinazione fra scarpette e solette aumenta la velocità di guarigione a livelli “impossibili” è quella dei cavalli laminitici. Per favore, leggete “Aggiornamento sulla laminite” e poi “Breakover”sul mio sito per trovare tutti i protocolli che ho trovato efficaci. Questo articolo semplicemente tratta in dettaglio un particolare del quadro d’insieme. Le scarpette sono di gran unga il mezzo più efficace per ottenere allo stesso tempo il massimo di protezione e la maggiore velocità di guarigione che posso immaginare.
Ci sono alcuni problemi molto importanti in rapporto con la ferratura con cui occorre confrontarsi, di fronte a un cavallo che ha perso le regolari connessioni fra la muraglia e il triangolare. La nostra sola possibilità è di tentare di stabilizzare il rapporto fra il triangolare e la muraglia per un tempo abbastanza lungo da permettere la ricrescita di una nuova muraglia ben connessa dalla corona alla suola. Tradizionalmente, i maniscalchi hanno utilizzato vari stratagemmi per tentare di stabilizzare la situazione, ma una cosa che tutti questi sistemi hanno in comune è che il supporto al triangolare è comunque rigidamente connesso alla muraglia. Non dico che maniscalci competenti non siano mai riusciti ad aiutare un cavallo laminitico. So che sono riuscito a far stare meglio e a migliorare la situazione di molti cavalli laminitici con un gran numero di sistemi di ferratura che utilizzavo una volta, e sono orgoglioso del mio lavoro. Nessuno può impedirmi di ricordarlo volentieri, per cui capisco pienamente i maniscalchi che si mettono sulla difensiva quando i “fanatici del movimento barefoot” agiscono come se loro fossero dei diavoli neri.
Ma possiamo sempre imparare cose nuove. In un cavallo laminitico, la muraglia non è connessa a nient’altro che, forse, alla corona, in genere in una posizione sbagliata rispetto al triangolare. Questo significa che qualsiasi supporto al triangolare che sia attaccato alla muraglia non può essere stabile. Il movimento e lo sforzo risultanti sono sufficienti a rendere il distacco sempre peggiore, tanto da rendere pressoché impossibile la crescita di una nuova muraglia, perfettamente connessa, finché si usano i ferri (probabilmente del tutto impossibile, ma ho aggiunto il “pressoché” per concedere a tutti i maniscalchi, di cui non ho visto i risultati, il beneficio del dubbio).
Peggio ancora, la muraglia cresce continuamente, per cui anche se uno applica un ferro che fornisce un supporto perfetto al triangolare oggi, entro domani questo supporto si sarà spostato un pochino a causa della crescita della muraglia. Tempo quattro settimane, questo supporto si è allontanato di un centimetro o più, e non c’è niente che possa impedire al triangolare di affondare seguendolo. Ripeto, il cavallo no è mai stato fatto per restare appeso alle proprie lamine senza il supporto della suola dal di sotto, ma effettivamente lo devono fare, quando la gente ce li costringe routinariamente. Quando le lamine sono infiammate e indebolite, tuttavia, questa è la premessa per un disastro.
Il semplice criterio di ottenere un buon supporto per il triangolare attraverso una suola callosa e di mettere a riposo da ogni stress sulla muraglia la metà anteriore del piede ha consentito ai professionisti della cura naturale dello zoccolo di risolvere rotazioni di 20 gradi in modo routinario, in tutto il mondo, mentre la gran parte dei maniscalchi ritiene incurabile una rotazione di gradi. Adesso ne avete capito la ragione.
Ma non è che il “sistema barefoot” non abbia i suoi problemi… La suola spessa e callosa è progettata per sostenere il cavallo e svolge temporaneamente questo compito molto bene, finché una muraglia ben connessa non cresce a collaborare a questo compito. Molto spesso, tuttavia, il maniscalco precedente ha raspato via da sotto il triangolare un bel po’ di suola (leggete “Leggere le suole” sul mio sito). Il corion sensibile può essere esposto o protetto solo da 1/16 di pollice di suola. Inoltre, se il cavallo è ancora in una fase acuta della laminite, il corion della suola potrebbe essere infiammato e ipersensibile: proprio come le lamine. Il modo più rapido di costruire materiale della suola, come quello del fettone, sono miglia e miglia di alternanza di pressione e rilascio. L’esercizio è anche uno dei sistemi migliori di rimediare agli effetti dell’eccesso di alimentazione, in questi casi. Ma la osa è più facile a dirsi che a farsi in un cavallo laminitico, ed inoltre è pericolosa. Se costringete a camminare un cavallo laminitico con una suola sottile e infiammata, non farete solo una crudeltà, ma rischiate anche una sobbattitura. Questo provocherà un ascesso e poi il cavallo dovrà ricostruire una nuova suola dall’inizio.
Inoltre, gran parte dell’apporto sanguigno alla suola proviene dall’arteria circonflessa, che corre intorno al margine distale del triangolare. Se la suola è sottile, la pressione in questa regione può ostacolare l’afflusso sanguigno e ridurre le capacità di crescita della suola semplicemente per carenza di nutrizione. Ancora una volta, dobbiamo assicurare una meccanica adeguata a far crescere una muraglia ben connessa, in una condizione in cui il movimento è doloroso e perfino pericoloso. Molti, me incluso, dicevano a suo tempo che “è un rischio che dobbiamo correre”, perchè l’unica altra alternativa è la soppressione del cavallo. Abbiamo risolto centinaia di casi di laminite in questo modo, aspettando pazientemente che si formi abbastanza suola da permettere un movimento confortevole.
Questo è il punto in cui le scarpette e le solette di vengono di nuovo in soccorso, con risultati molto migliori. Come nel caso dei cavalli navicolari, possiamo avere “la botte piena e la moglie ubriaca”. Possiamo fornire una perfetta “meccanica della ricrescita” mentre assicuriamo la miglior protezione possibile allo zoccolo. Rendono quasi tutti i cavalli laminitici (il “quasi” è detto solo per onestà) pronti a muoversi; perfino ad essere montati, appena la dieta è stata sistemata in modo da far uscire il cavallo dalla fase acuta della malattia; a prescindere dal grado di rotazione o di slittamento verticale (purché non ci siano ascessi).
In genere l’applicazione di una soletta è molto più semplice, nei cavalli laminitici; una semplice soletta piatta è tutto quello che vi serve, anche se potreste trovare un cavalo che ne richiede due, nel qual caso le Epic non funzionano. Avrete bisogno di scarpette che si indossano dall’alto, come le Boa, le Old Mac e altre.
Tuttavia, spesso all’inizio dobbiamo mettere i cavalli all’aperto con le scarpette, cosa che crea alcuni problemi che dovete conoscere. Le scarpette sono progettate solo per cavalcare, e molti modelli svolgono questo compito molto bene. Ma se le fate indossare al cavallo a lungo, diventano probabili fiaccature e ragadi. questo è quanto di meglio posso proporre per evitare queste complicazioni:
#1 Usate le Epic. (Qui di nuovo faccio la figura di un venditore di scarpette. Mi spiace, ma sto solo riferendo i fatti come mi risultano) . Si può avere successo con una costante permanenza all’aperto usando molte marche di scarpette, ma con le Epic la sola cosa che tocca la pelle è la ghettina superiore, morbida e flessibile.
#2 Fate dei “calzini” che coprano la pelle/il pelo con nastro da veterinario.
#3 Spruzzate tutto il piede con la Sprinkle Gold Bond Medicated Powder prima di indossare le scarpette. Questo riduce drasticamente anche il fetore al loro interno.
#4 Accertatevi che siano della misura giusta. Se le scarpette possono ruotare, causeranno fiaccature.
#5 Togliete le scarpette ogni giorno per lavarle, disinfettarle, asciugarle ed esaminarle. Se vedete che si sta sviluppando una fiaccatura, metteteci sopra del nastro isolante prima di applicare il nastro da veterinario. Questo farà in modo che ogni ulteriore movimento si scarichi sul nastro, piuttosto che sulla pelle del cavallo.
#6 Smettete di usare le scarpette durante la permanenza all’aperto non appena il cavallo si muove bene senza nel suo paddok, ma continuate ad usarle finché ogni distacco laminare non si sia risolto, e finché la suola callosa non abbia raggiunto il suo spessore ottimale.
Mi rendo conto che ci sono parecchi problemi. Tutto questo carica il proprietario di gran parte della responsabilità e dell’impegno delle cure. La ferratura è sempre una soluzione più comoda. Il maniscalco torna ogni 4-6 settimane, risistema i ferri e il proprietario non ha altro dovere che quello di pagare il conto. Ma ragazzi, quanto vi ho suggerito funziona meglio e perciò ha senso, per i proprietari che vogliano veramente guarire i loro cavalli laminitici in modo definitivo.
Devo raccontarvi quello che mi è successo con alcuni clienti (due studenti in veterinaria e un tecnico veterinario) qualche mese fa. Avevano un cavallo che aveva avuto un episodio di laminite acuta, ed era rimasto zoppo e chiuso in box per tre settimane. Ho pareggiato il cavallo per oro, e poi ho suggerito di metterlo in paddok e di cominciare a muoverlo. Immediatamente hanno detto che il veterinario aveva raccomandato di lasciarlo nel box fino a che non si sarebbe sentito meglio, e non avesse più avuto un polso digitale aumentato o un innalzamento della temperatura dello zoccolo. Sapevo che dovevo far uscire quel cavallo all’aperto, ma non voglio mai smentire i veterinari. Dal punto di vista ella responsabilità, sarebbe un suicidio. Quindi, gli ho chiesto se sarebbe stato coerente con la prescrizione del veterinario far uscire il cavallo all’aperto, se fossi riuscito a farlo camminare senza disagio e a normalizzare il polso e la temperatura dello zoccolo prima di andarmene. Con sorrisini comprensibilmente scettici, mi hanno detto “Certo che sì”.
Così ho messo al cavallo scarpette e solette e ho chiesto al proprietario di camminare con lui per un quarto d’ora. Gli ho raccomandato di tornare indietro immediatamente se il cavallo avesse manifestato qualsiasi zoppia, ma in caso contrario di continuare a camminare per tutto il tempo. Il cavallo è camminato via del tutto a suo agio, ed è tornato indietro dopo un quarto d’ora con polso digitale normale e senza anormale riscaldamento della zoccolo. OK, ho “giocato sporco” un pochino. Non ero del tutto certo che il polso digitale si sarebbe normalizzato, ma sapevo per esperienza che c’era una probabilità del 90% almeno che succedesse. I cavalli si aiutano con il movimento e con il meccanismo dello zoccolo per la loro circolazione. Di certo, quando quelle ragazze si laureeranno, ricorderanno quel giorno. Se non mi credete sulla parola, va benissimo Provatelo su un cavallo; le solette sono magiche.
Nonostante che io abbia usato le scarpette dal momento che ho lasciato la ferratura, ho iniziato veramente questa “avventura delle solette” tre anni fa. C’è ancora molto da imparare sull’argomento, così prendete quello che vi ho detto come un punto di partenza che vi ho fornito, e poi continuate a riflettere; continuate a imparare! Non considerate la zoppia di un cavallo come un fatto inevitabile; nemmeno per un giorno soltanto. Il movimento significa crescita. Un movimento corretto crea uno zoccolo di forma corretta. Una forma corretta dello zoccolo equivale a una necessità di protezione scarsa o nulla. Questo accelererà i vostri tempi di riabilitazione oltre i vostri sogni.